This problem is known as the ‘dreaded descale light’ issue. But it’s not really an issue. It’s actually a step in the process that you could be doing wrong.
Your Keurig is not turning the DESCALE light off because you have not finished the process correctly. So it gets stuck in descaling mode until you finish process.
Why Your Descale Light Won’t Turn Off
The reason the descale light on your Keurig is not turning off is because you did the descaling steps wrong, or in some models, it needs to be existed manually.
In the case of Keurig K-Slim, it exists descale mode automatically if you do each step correctly. So if your light is still on, it is still suck in descale mode. It is stuck because you did not repeat each step as required, but most likely did it only once. Read the steps below…
To successfully descale your Keurig, each step has to be repeated multiple times until you can move on to the next.
The Descaling process is a two part process:
first, using the water mixed with the descaling solution until it runs out.
second, adding the fresh water to rinse the machine out.
What many users do is: run each of these steps just once. What has to be done is repeat each step until the machine indicates that you can move on to the next step.
- You will repeat step one, as in refill the reservoir every time it has emptied until the ADD WATER light comes on…. (at this point, you should see both the descale and add water lights on)
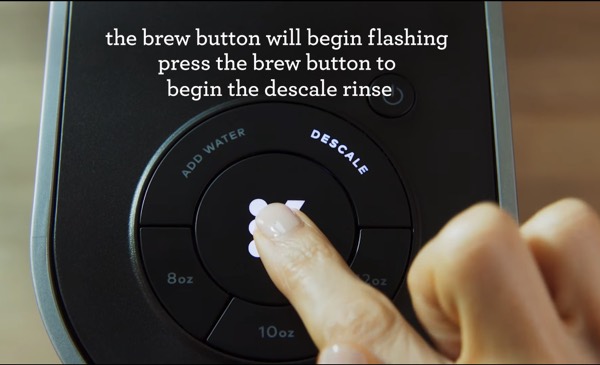
- Start the rinsing process by adding water (clean, with no descale solution). When you put the reservoir again, the K button will flash. Press it. Repeat this step until all lights go off.
Read below for the details…
How To Turn Off the Descale Light on a K-Slim

Let’s go to the beginning of the descaling process and work through them step by step and I’ll tell you EXACTLY what went wrong:
- Your machine should be plugged in but not powered on.
- Start by filling the reservoir with the descaling solution (you can substitute it with Vinegar). You’ll want to create a 1:1 ratio solution. So add the entire bottle of solution (14 oz) to the empty reservoir, then fill the bottle with water and pour that in to the reservoir. Now you have 28 oz of solution mix in your reservoir.
- Enter the descale mode by pressing the 8oz and 12oz buttons together for few seconds until the Descale light turns solid. The machine is now in descale mode and the K button will start flashing.
- Press the K button to start the descale cycle. The machine will dispense about 12 oz of the solution and stop, the K button will start flashing again. Press the K button again to restart the process. REPEAT this step until the ADD WATER light starts flashing. *This is where you probably went wrong*
- Now, take your reservoir and rinse it from any solution residue, then fill it to the MAX line with clean water. The ADD WATER light should go off now and you’ll see the DESCALE light turn on again and the K button flashing…
- Press the K button to start the fresh waster rinse. Just like with the solution rinse, each time the rinse cycle stops and the K button flashes, you’ll have to REPEAT this step until the DESCALE light finally turns off and the machine turns off completely.
With that, you’ve successfully descaled the machine and it has automatically exited descale mode.
Pay Attention To…
- Make sure you have successfully activated the descaling mode in the first step. You’ll see the DESCALE light is on SOLID.
- Once you have entered the descale mode, never press any buttons or do anything to the machine, simply follow the steps exactly as said.
- Make sure to always fill the reservoir to the MAX line.
- DO NOT SKIP STEPS. Run each step until you see the indicator for the next step light on.
How To Know The Descale Process Is Finished?
If you do each step correctly, the descale light will go off on its own. You’ll notice all lights on the machine have turned off, which means, it has exited the Descale mode. You can now turn the machine on and brew as usual.
