If you’re having trouble with your Nespresso Aeroccino milk frother, don’t worry – you’re not alone. From flashing lights and buttons, to the frother not working all together or not performing best. Here are some common problems people experience and how to fix them.
Common Nespresso Aeroccino Errors and How To Fix Them
Nespresso Frother Red Button Flashing On Aeroccino 3 or Three Buttons Flashing Red on Aeroccino 4
This indicates the same issue on both the Aeroccino 3 and 4. The difference is the one has a single button and the other has 4 total buttons.
What It Means:
- If your Aeroccino button is rapidly flashing RED light, or sometimes, it flashes then stops in the middle of heating the milk, it means it has overheated.
- For Aeroccino 3, another reason could be that you did not fill it with enough milk.
How To Fix It:
- Pick up the frother jug and run it under water to cool it down.
- Make sure it’s clean and there’s no water in the base.
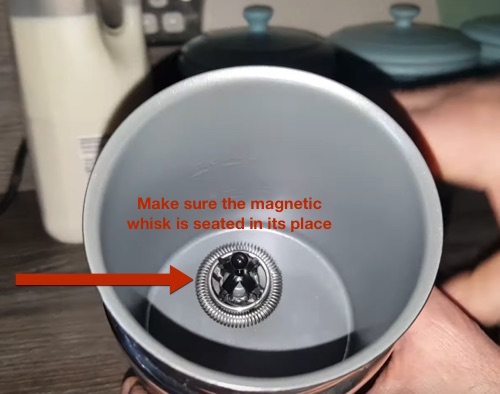
- Make sure the jug attaches correctly to the base and the whisk is also sitting correctly inside.
What Causes the Problem:
Using the frother back to back causes it to overheat. If you need to use the Aeroccino more than once in a row, make sure to rinse it with cold water and clean it before using. This is because there is a safety thermostat that stops the spinning and heating of milk if the temperature gets too high–which could cause burning out.
What if this is happening even if you’re using the frother for the first time in the day?
It still means that the thermostat is signaling that the frother is overheated. If this is happening when your frother is cool, it could be due to milk build up inside the frother.
If you don’t clean your Aeroccino after each use, milk with start to build up and affect how it heats and will result in red button flashing rapidly. Basically, the Aeroccino will sense that there’s hot milk inside it when there isn’t. To avoid this, make sure to rinse both the jug and the whisk with cool water and ensure there is no milk residue or stuck milk anywhere.
One more possible reason the Aeroccino 3 especially does this, is because you did not fill it up with enough milk. Always make sure you fill it to, at least, the first MAX line.
Aeroccino 4 All Buttons Flashing Red + One Button Flashing Blue
If all four buttons on your Aeroccino 4 are rapidly flashing, that means three buttons (for all hot froth options) and the cold froth button are flashing and the machine won’t start…
What It Means:
There’s not enough milk in the jug.
How To Fix It:
- Always make sure you fill the jug up to either the minimum or max lines. Keeping in mind that each type of froth density uses a different max line.
- For cappuccino froth, use the lower MAX line. For Latte froth, use the higher MAX line.
Aeroccino Is Not Turning On Or Not Frothing
If your Aeroccino is not turning on, or it’s not frothing the milk like usual, there may be an issue with the base.
What It Means:
Either the jug or whisk are not correctly in place.
How To Fix It:
- Check that both the jug and whisk are sitting correctly on the base. You may need to reattach them to ensure there’s a good seal and contact with the base. If you’re still having problems, try cleaning out any milk residue or buildup in the base and make sure there’s not anything hindering the connection between the base and jug or whisk.
- The frother is designed to not run unless all connectors are dry and everything is set in place. If your Aeroccino is still not turning on or frothing milk after trying these steps, you may need to contact Nespresso customer support for further assistance.
Aeroccino Is Not Making Froth (Or Little Froth)
If your Aeroccino is not making froth, or if it’s making very little froth, there are a few things you can check.
- One possibility is that you’re using the wrong milk temperature. The Aeroccino is designed to work with cold refrigerated milk, so make sure you’re using the correct temperature for your desired froth.
- Another thing to check is whether you’re using any additives in your milk. Some additives (like honey, syrups, powdered flavorings) can prevent the Aeroccino from creating froth. So, try eliminating any additives from your milk and see if that makes a difference.
- If you’re using a milk alternative like almond, coconut, or rice milk, you may need to experiment with different types to get the desired froth. Milk alternatives often create various results depending on the brand and type.
Last, but not least, if you are using the Aeroccino 3, make sure you are using the correct whisk (or there’s actually a whisk in place) for your desired froth. If you are using Aeroccino 4, there’s no need to switch whisks as it only uses one.
Milk or Froth Is Overflowing
If your milk or froth is overflowing and spilling out of the Aeroccino, it’s likely that you have too much milk in the jug.
To fix this issue, try using less milk next time. You’ll want to look for either the min or max lines on the inside of your frother, depending on what froth density you’re making. If you don’t see any lines, try generally filling the jug between 1/3 and 2/3 full of milk.
This is applicable to Aeroccino 3:
- If you’re using the spring with the whisk (for cappuccino foam), only fill to the lower MAX line.
- If you’re using the whisk without the spring, you can use the upper MAX line.
Best Way to Clean an Aeroccino Milk Frother
For the best way to clean an Aeroccino milk frother, there are a few key things to keep in mind.
The most important thing is to make sure that you’re using cool water for rinsing and cleaning. Using warm or hot water can damage the components of your Aeroccino, preventing it from working properly.
Another key step is to make sure that you’re giving your milk frother plenty of time to dry between uses. This will help prevent any mold or buildup from forming, which can negatively impact performance and reduce the lifespan of your Aeroccino. Don’t close the lid until you ensure the interior is dry.
If you are using Aeroccino 3 – this frother should NEVER be submerged in water since it’s not waterproof. Wash it by rinsing the jug with water, without allowing the electric components on the bottom to get wet. Then dry it immediately with a towel.
If you are using the Aeroccino 4, on the other hand, the jug is waterproof and is actually dishwasher safe. So it’s totally easier to clean and maintain.
Summary
If you’re having issues with your Aeroccino not frothing milk or overflowing, I’ve outlined some troubleshooting tips for you. First, make sure that all connectors are in place and dry before trying again. If the problem persists, try cleaning out any milk residue or buildup and checking the temperature of your milk. You may also need to experiment with different types of milk alternatives if you’re using one. Lastly, if your froth is spilling out, it’s likely because you have too much milk in the jug. Try filling it between 1/3 and 2/3 full next time for best results. Keep these tips in mind for an easy Aeroccino experience!